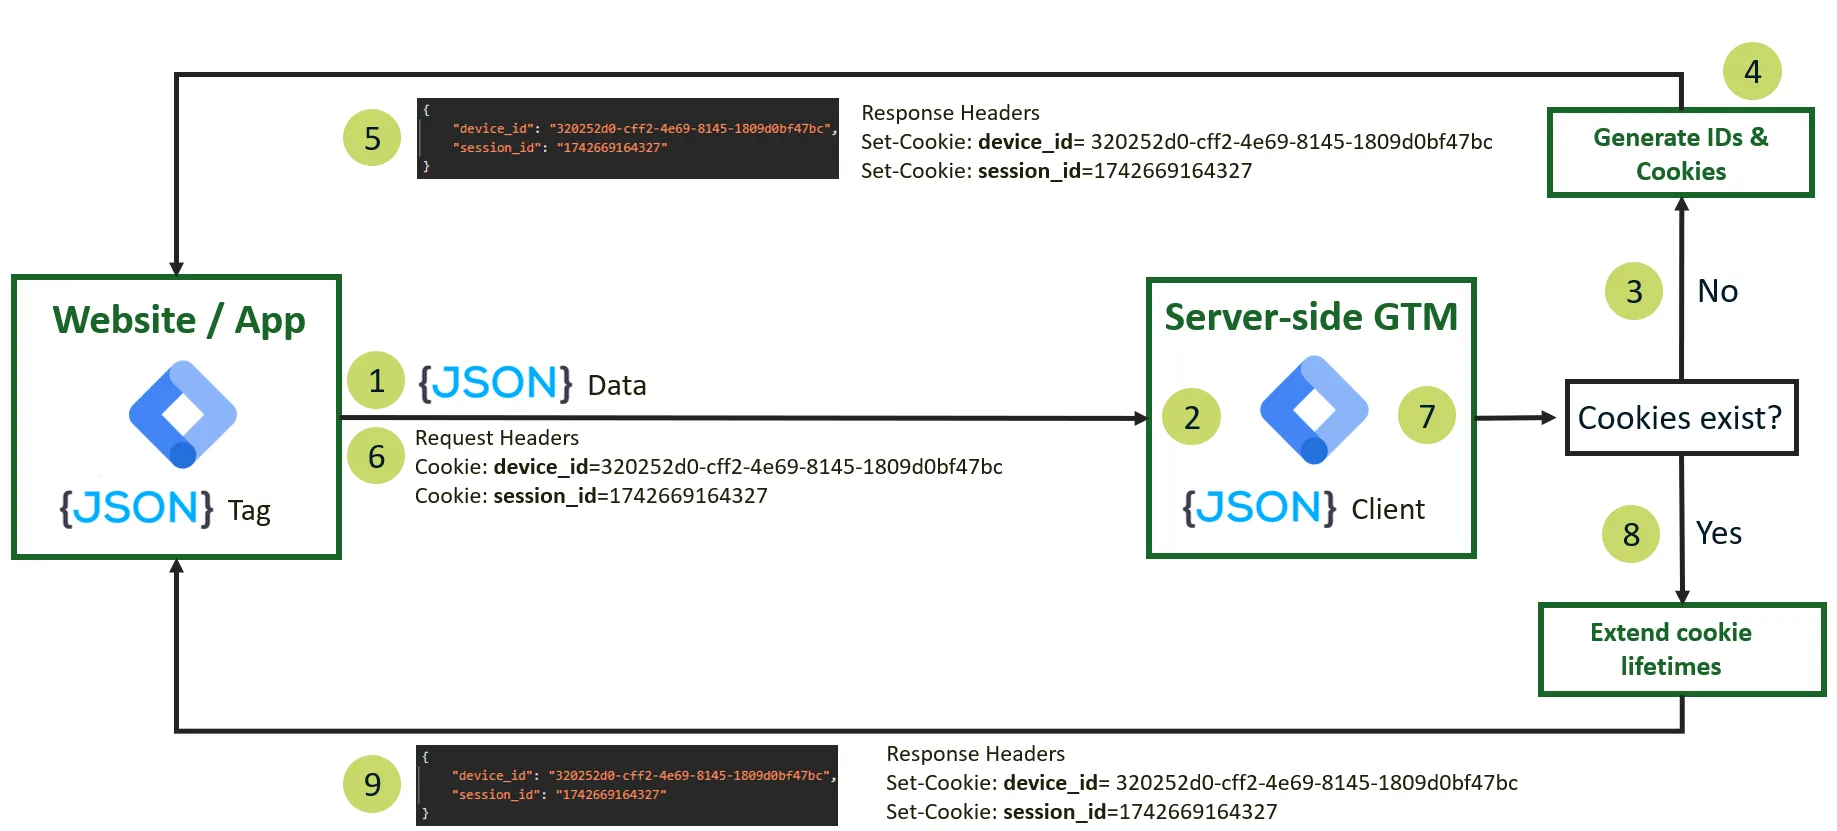
The Server Side Google Tag Manager (server-side GTM or ssGTM) is a very powerful tool from Google which allows us to move parts of our tracking implementation to the server to gain flexibility, control and a more robust setup regarding browser based tracking preventions and ad blockers.
The nice thing is, that google offers the possibility to install the ssGTM on our own server using a docker image (Manual Setup Guide from Google for ssGTM). This means that we can set it up in a real first party context without the need for any CNAME Cloaking tricks to “fake” the first party context.
Unfortunately most shared hosting providers do not offer the possibility to install docker images and to configure the webserver to point to these docker images so that they can be accessed from the internet. You would need root access to the command line for this. To be able to try it out myself I thought about installing it on my Raspberry Pi. It was more difficult than I initially expected but I got it working in the end. Afterwards, I moved my whole website to a virtual private server with root access and installed the ssGTM there to use it in production.
In this post I will go through the whole process and my learnings about how to set up the ssGTM on a Raspberry Pi or on a Ubuntu / Debian Server. You can select one of the options below.
ssGTM Setup on Raspberry Pi – Pro and Cons
A Raspberry Pi is a mini computer running on ubuntu linux which you can get for less than 100 euro / dollars for example on amazon (See: Raspberry Pi 4 4GB Starter Set on Amazon (Advertising Link)). It is a one time investment without running costs except the energy costs which are also very low (3-4W). You can connect to it with ssh via the command line and install any software on it, just like the ssGTM docker containers.
The downside is, that you probably do not want to run a webserver and the ssGTM docker containers there on production because of performance and security reasons. Your Raspberry Pi is usually directly connected to your router in your home network and you would need to configure port forwarding to allow access to it from the internet. This is a potential security risk which I personally would not like to keep open for the longterm.
But for me the setup on the Raspberry Pi was nice to get used to linux server administration again and to do some first tests without going to production with the ssGTM Setup. So if you do not want to move your website to a virtual private server and do not yet want to move to production with your ssGTM, the Raspberry Pi is a great choice to get some first hands on experience.
ssGTM Setup on Ubuntu / Debian Server – Pro and Cons
If you already feel comfortable in the linux commandline and want to use your own ssGTM in production in a real first party context, it is a good idea to move your website to a virtual private server (VPS) or a dedicated server and set up the ssGTM there.
I did some research about good providers and found Hetzner and IONOS to be the most interesting ones in germany. For me personally it is a bit too risky to manage my mail servers myself as well, so I was looking for a provider, which still manages the email servers for me and offers the DNS configuration of my domain and subdomains as well. IONOS was the best fit here for me and they offer a VPS already from 1€ per month but I would propose to use the S package at least which costs 3€ a month.
The initial setup to run your own website on a VPS or dedicated server takes quite some time compared to the setup on Shared Hosting because you will need to install and setup everything from scratch like PHP, MySQL and the webserver itself. But once this is done, the setup of the ssGTM will be basically the same as on the Raspberry Pi and then you will benefit from better performance and full flexibility.
ssGTM Setup Guide
Let’s get our hands dirty now and start with the setup!
Creating the ssGTM Container at tagmanager.google.com
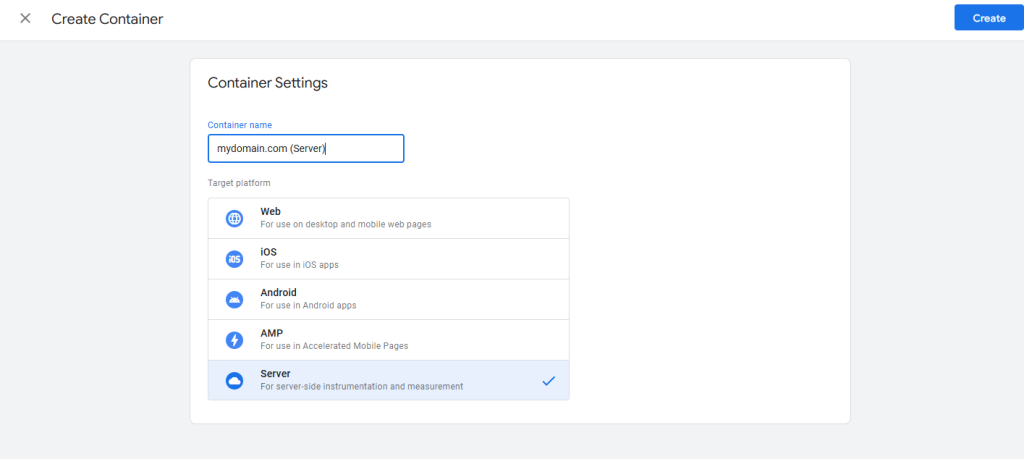
The first step is to create the Server-side Google Tag Manager Container at https://tagmanager.google.com/ to receive the Container Config String. You will need this container config string later in the creation of the ssGTM Docker Containers.
You will need to select the container type “Server”:
Afterwards you are asked if you want to automatically or manually provision the tagging server. It’s important to select “manual” here, so that the Container will not be created automatically on the google cloud platform and you will get the container config string for the docker container configuration:
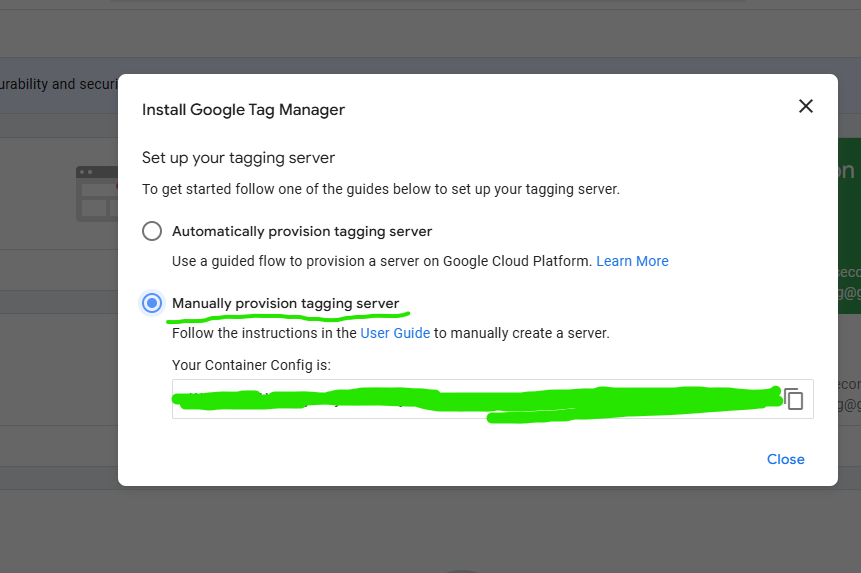
You can copy the container config string and save it for later but it is also possible to retrieve it again later. Now we can continue with the next step.
Subdomain Configuration
I initially tried to get the ssGTM running completely locally on my Raspberry Pi without creating the actual subdomains and without opening up the Raspberry Pi to the public internet but unfortunately this did not work.
Google requires you to select a https domain in both the configurations of tagmanager.google.com and the preview server url setting in the ssGTM docker container. I tried editing my local windows hosts file to create a custom subdomain which is only valid on my device and then use self-signed SSL certificates to create trusted SSL connections in the browser. Once I finished the setup, the docker container of the gtm server threw an error that self-signed certificates are not allowed.
This means for both the options we need to configure real subdomains and point them to our Raspberry Pi or Linux Server.
As we need two docker containers, one for the gtm server and one for the preview server, it is the easiest to just create two subdomains in the following format:
sst.yourdomain.com
sst-preview.yourdomain.com
For the Raspberry Pi and the Linux Server the next step differs, so pick your option below.
As the Raspberry Pi is probably connected to your own home network, you need to point the sub domains to the public IP-Address of your home network router and configure port forwarding to forward requests to your router from port 80 (HTTP) and 443 (HTTPS) to your Raspberry Pi.
This youtube video explains port forwarding very well: https://www.youtube.com/watch?v=AFeye1zLpFo
Port forwarding might not be supported by your Internet Service Provider (ISP) and as I mentioned above, it is a security risk to use port forwarding in general. If you can and want to use it for testing purposes, it might be a good idea to add a password prompt (basic authentication) to the subdomains. More about this later in the guide.
Also it might make sense to always turn off the Raspberry Pi after you performed the testings in case Port Forwarding remains open in your router configuration.
After you configured the port forwarding on your router you will need to go to your domain provider configuration and make sure that DNS A-Records are created to point the subdomains to your routers public IP Address.
After you created the subdomains, you will need to make sure that the DNS A-Records point to the public IP-Address of your Ubuntu / Debian Server.
Command Line Access and System Update
In both cases (Raspberry Pi or Ubuntu / Debian Server) we will need to get access to the command line. In case you are not yet familiar with this, I can recommend the software PuTTY. Once you have access to the command line it will look like this:

Now we are able to execute commands on the Raspberry Pi or Ubuntu / Debian Server. The first step should always be to update the already installed dependencies to the most recent versions. Just execute the following commands:
sudo apt-get updatesudo apt-get upgradeWebserver Installation and Configuration
We need to configure the webserver to make sure, that the requests to the tracking and preview server are handled correctly. I am showcasing the process here with nginx but it should work similar with Apache as well.
First we should check if nginx is already installed and running:
nginx -v
systemctl status nginx
If nginx is not installed yet, it can be easily installed with this command:
sudo apt install nginxThen it needs to be started and enabled:
sudo systemctl start nginx
sudo systemctl enable nginx
Now when you go to your browser and type in the IP of your Raspberry Pi or of your Linux server, you should see the standard nginx welcome page! You should see the same when opening up the sst. and sst-preview subdomain in your browser.
Before we setup the configuration, we should configure the password protection. For this we first need to install htpasswd:
sudo apt update
sudo apt install apache2-utils
Then we need to create the .htpasswd file to store our username and passwort for the password prompt. You need to replace “yourusername” with the username you want to use and enter the password you wish to use when you are asked for it:
sudo htpasswd -c /etc/nginx/.htpasswd yourusernameWe are not configuring the password protection for the subdomains on the Ubuntu / Debian Server, so you can continue to the next step.
Now we need to configure nginx to point the subdomains to the docker containers which we will create later. To enter the editor to create a new site configuration we need to execute the following command:
sudo nano /etc/nginx/sites-available/sstThe following configuration points our subdomains sst. and sst-preview. to the docker containers which we will create in the next step.
As we need to support the passwort prompt at the Raspberry Pi, the configuration differs, so please select your option below.
You can simply copy this configuration and paste it in the terminal editor with a right click. But before doing so, you need to replace “yourdomain.com” with your actual domain name of course.
server {
    server_name sst.yourdomain.com;

    location / {
        auth_basic "Restricted Access";
    	  auth_basic_user_file /etc/nginx/.htpasswd;
        proxy_pass http://127.0.0.1:9090; # GTM-Server
        proxy_set_header Host $host;
        proxy_set_header X-Real-IP $remote_addr;
        proxy_set_header X-Forwarded-For $proxy_add_x_forwarded_for;
    }
}

server {
    server_name sst-preview.yourdomain.com;

    location / {
        auth_basic "Restricted Access";
    	  auth_basic_user_file /etc/nginx/.htpasswd;
	      proxy_pass http://127.0.0.1:8080; # GTM-Preview-Server
        proxy_set_header Host $host;
        proxy_set_header X-Real-IP $remote_addr;
        proxy_set_header X-Forwarded-For $proxy_add_x_forwarded_for;
    }
}
You can simply copy this configuration and paste it in the terminal editor with a right click. But before doing so, you need to replace “yourdomain.com” with your actual domain name of course.
server {
    server_name sst.yourdomain.com;

    location / {
        proxy_pass http://127.0.0.1:9090; # GTM-Server
        proxy_set_header Host $host;
        proxy_set_header X-Real-IP $remote_addr;
        proxy_set_header X-Forwarded-For $proxy_add_x_forwarded_for;
    }
}

server {
    server_name sst-preview.yourdomain.com;

    location / {
        proxy_pass http://127.0.0.1:8080; # GTM-Preview-Server
        proxy_set_header Host $host;
        proxy_set_header X-Real-IP $remote_addr;
        proxy_set_header X-Forwarded-For $proxy_add_x_forwarded_for;
    }
}
To save the configuration you need to hit Control + O and then Control + X and the editor should be closed again.
Now we need to test the configuration with the following command:
sudo nginx -tIf the test is ok, we can enable the configuration. To enable the configuration we need to create a symbolic link like this:
sudo ln -s /etc/nginx/sites-available/sst /etc/nginx/sites-enabled/Now we need to install an SSL certificate and add it to the configuration. This can be done automatically using certbot. First we need to install it like this:
sudo apt update
sudo apt install certbot python3-certbot-nginx
Then we can request the certificate using certbot. Again you need to replace yourdomain.com with your actual domain name:
sudo certbot --nginx -d sst.yourdomain.com -d sst-preview.yourdomain.comNow we can restart nginx to activate the changes:
sudo systemctl reload nginxDocker Installation
The next step is to install docker. For this we need to execute the following commands:
curl -fsSL https://get.Docker.com -o get-Docker.shsudo sh get-Docker.shsudo usermod -aG docker $USERnewgrp dockerDocker should be successfully installed now!
Installing the ssGTM Docker Images
Now we are ready to install the ssGTM docker images! In my tests I had to reinstall the docker containers multiple times in order to find out how the configuration works best. For more convenience I propose the usage of docker compose which allows to install and setup multiple docker containers at the same time and easily uninstall them again if needed.
To install docker compose you need to execute the following command:
sudo apt-get install docker-compose-pluginThe next step is to create the docker compose configuration file (docker-compose.yaml). We can create a separate folder to keep the server clean here:
mkdir ssgtm-dockerNow we can enter this new folder with “cd”:
cd ssgtm-dockerYou should now see “username@yourserver:~/ssgtm-docker$” in the console, which indicates that you are in the newly created folder.
Now we can open the file editor while specifying the new file name like this:
sudo nano docker-compose.yamlBefore pasting the configuration below in the editor, you need to make sure to replace “YOUR_CONTAINER_CONFIG_STRING” with the actual container configuration string you copied from https://tagmanager.google.com/.
You will also need to replace yourdomain.com with your actual domainname of course 😉
The configuration differs between the Raspberry Pi and the Ubuntu / Debian Server so you need to select the option below to see the needed configuration for your setup.
You also need to replace yourusername and yourpassword with the username and password you configured in htpassword in the webserver configuration.
version: "3.8"

services:
  gtm-server:
    image: gcr.io/cloud-tagging-10302018/gtm-cloud-image:stable
    container_name: gtm-server
    platform: linux/amd64
    environment:
      - CONTAINER_CONFIG=YOUR_CONTAINER_CONFIG_STRING
      - PREVIEW_SERVER_URL=https://yourusername:yourpassword@sst-preview.yourdomain.com
    networks:
      - gtm-network
    ports:
      - "9090:8080"
    restart: always

  gtm-preview-server:
    image: gcr.io/cloud-tagging-10302018/gtm-cloud-image:stable
    container_name: gtm-preview-server
    platform: linux/amd64
    environment:
      - CONTAINER_CONFIG=YOUR_CONTAINER_CONFIG_STRING
      - RUN_AS_PREVIEW_SERVER=true
    networks:
      - gtm-network
    ports:
      - "8080:8080"
    restart: always

networks:
  gtm-network:
    driver: bridge
version: "3.8"
services:
gtm-server:
image: gcr.io/cloud-tagging-10302018/gtm-cloud-image:stable
container_name: gtm-server
environment:
- CONTAINER_CONFIG=YOUR_CONTAINER_CONFIG_STRING
- PREVIEW_SERVER_URL=https://sst-preview.yourdomain.com
networks:
- gtm-network
ports:
- "9090:8080"
restart: always
gtm-preview-server:
image: gcr.io/cloud-tagging-10302018/gtm-cloud-image:stable
container_name: gtm-preview-server
environment:
- CONTAINER_CONFIG=YOUR_CONTAINER_CONFIG_STRING
- RUN_AS_PREVIEW_SERVER=true
networks:
- gtm-network
ports:
- "8080:8080"
restart: always
networks:
gtm-network:
driver: bridgeAfter we saved the configuration file with Command + O and closed the editor with Command + X, we can start the docker containers with this command:
docker compose up -dFinal Step: Test if everything works as expected
Now we can test if everything works as expected 🙂
If you enter https://sst.yourdomain.com/healthz and https://sst-preview.yourdomain.com/healthz you should see the message “ok”.
Then we need to go to https://tagmanager.google.com/ to our server container and navigate to Admin -> Container Settings and click on Add URL to add our server domain:
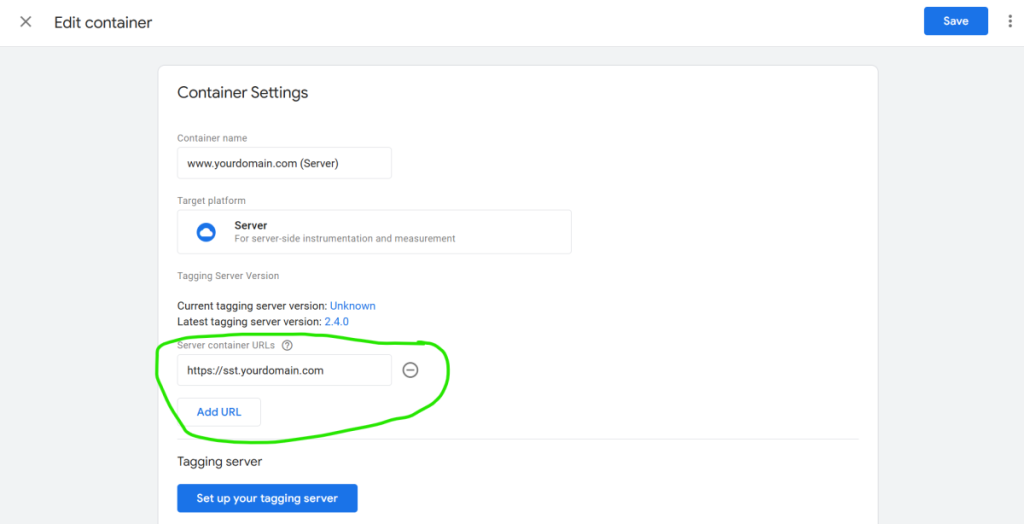
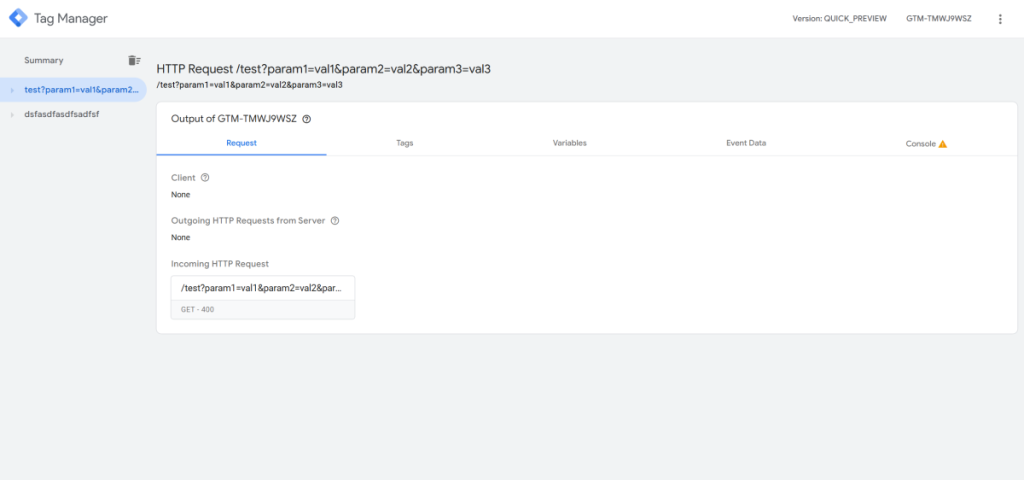
Afterwards we can go back to the server container and click the “Preview” Button. If you now open a new tab and type in: https://sst.yourdomain.com/test?param1=val1¶m2=val2¶m3=val3
You should get a 400 Error but when you check the preview window you should see the request:
Congratulations! If you reached this step, you should be done and everything should work as expected 🙂 If you have questions or want to propose an optimization of the article, feel free to contact me on LinkedIn!
